Getting Started
Welcome to AutoAPMS Studio! This guide walks you through creating your first behavior tree.
Not installed yet?
If you have not installed AutoAPMS Studio yet, check the Installation Guide first. Or, you can use the Live Demo to try out AutoAPMS Studio without installing it.
Step 1: Open the Editor
After launching AutoAPMS Studio, open your browser and head to:
http://localhost:5173/auto_apms_studio/You should then see the AutoAPMS Studio web-editor interface including the two major parts:
- Left: Sidebar including the Node Palette and Tree Explorer
- Center: Workspace (Canvas) where you build your Behavior Tree
You should also see Controls in the bottom right corner. You can use these to center the workspace and automatically re-align the Behavior Tree.
Step 2: The Interface Components Explained
 Sidebar (Left)
The sidebar is divided into four sections:
- Sidebar Mode Switcher: Toggle between the Create and Deploy Sidebar Modes
- Tree Explorer: Lists your current workspace and all Behavior Trees in it. You can create, rename, and delete trees here.
- Node Palette: Lists all available node models and category. You can drag and drop nodes from here onto the workspace to create new nodes in your tree.
The node models are categorized by type: Control, Decorator, Action, Condition - Footer: Here you can Import and Export your Behavior Trees, open this Guide and open the Settings Menu
 Workspace / Canvas (Center)
This is the main area where you build your Behavior Trees. You can:
- Drag and Drop Nodes from the Node Palette onto the workspace to create new nodes
- Drag a Connection from a node to the Workspace to open a Node Model List
- Connect Nodes by dragging a line between the nodes
- Delete Nodes by clicking on them and pressing the Backspace key
- Center the workspace by clicking the Align button in the Controls panel
- Auto-Align the Behavior Tree's nodes automatically by clicking the Auto-Align button in the Controls panel
 Shortcuts
To improve your productivity, you can use the following keyboard shortcuts to interact with the editor:
| Action | Shortcut |
|---|---|
| Select Multiple Nodes | Shift + Click & Drag |
| Copy | Ctrl + C |
| Paste | Ctrl + V |
| Undo | Ctrl + Z |
| Redo | Ctrl + Y |
| Delete Node | Delete |
Step 3: Create Your First Behavior Tree
In this step, you will build a simple Behavior Tree that logs "Hello World!". It features the core functionalities of a Behavior Tree:
- A Sequence node that executes its child nodes in sequence
- A Blackboard node that stores key-value pairs
- A Fallback node that executes its child nodes until one succeeds
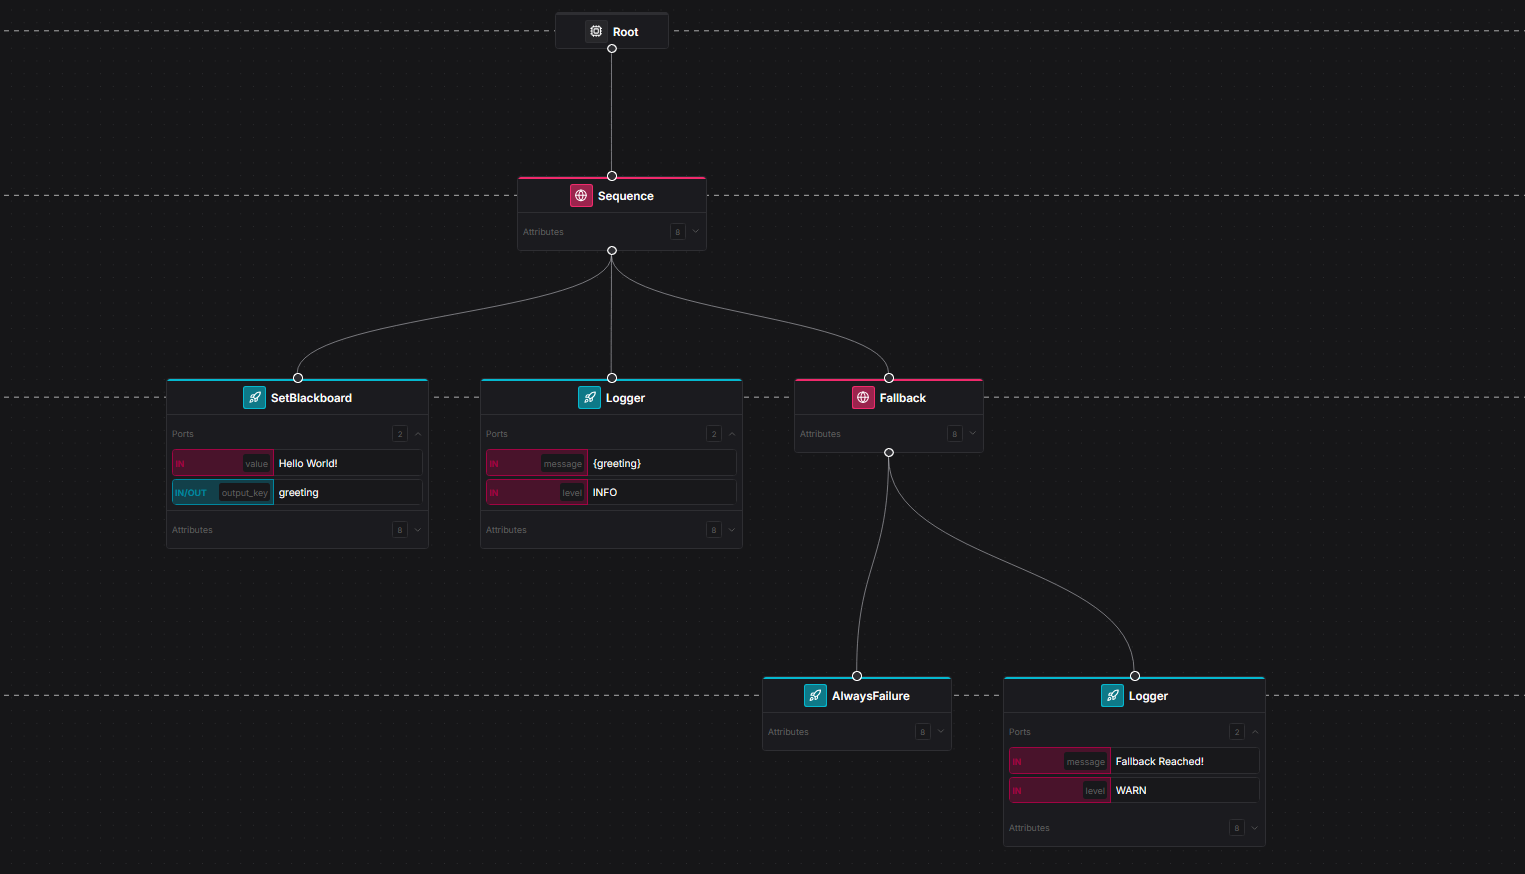
The tree you will build will look like this:
Root
└── Sequence
    ├── SetBlackboard     # Store the greeting in the blackboard
    ├── Logger            # Log the greeting from the blackboard
    └── Fallback
        ├── AlwaysFailure
        └── Logger        # Log the failure message
1. Add a Sequence Node
From the Node Model Palette in the Sidebar, search for the Sequence node and drag it onto the workspace. Then, connect the Sequence node to the Root node. You can use the Search Bar in the Node Palette to find the required node models.
2. Add the children of the Sequence Node
Drag the following nodes from the Node Model Palette onto the workspace and connect them to the Sequence node:
SetBlackboardLoggerFallback
3. Add the children of the Fallback Node
Drag the following two nodes from the Node Model Palette onto the workspace and connect them to the Fallback node:
AlwaysFailure: found under ActionLogger: found under Action
Step 4: Configure Nodes
Now we will configure the nodes in our Behavior Tree. To do so, click the port values and set them accordingly:
SetBlackboard
| Port | Value |
|---|---|
value | Hello World! |
output_key | greeting |
This stores the string Hello World! in the Blackboard under the key greeting.
Logger (connected to Sequence)
| Port | Value |
|---|---|
message | {greeting} |
level | INFO |
The {greeting} syntax reads the value from the Blackboard entry we set above.
Logger (connected to Fallback)
| Port | Value |
|---|---|
message | Fallback Reached! |
level | WARN |
How this tree executes
The Sequence runs its children from left to right and only succeeds if all children succeed:
SetBlackboardsets the greeting in the Blackboard. Succeeds if it can store it successfully.Loggerlogs the greeting. Succeeds if it can log it successfully.Fallbackruns its children until one succeeds.AlwaysFailurealways fails, the Fallback node moves onto the next child.Loggerlogs the failure message. Thus, the Fallback node succeeds.
The tree in general will return SUCCESS.
Your finished tree should look as follows:
Step 5: Save your Behavior Tree
Export as XML
AutoAPMS Studio supports two ways to export your work as BehaviorTree.CPP XML:
Export the entire Workspace
- Click the Export button in the Sidebar (bottom)
- Save the file, e.g., as
my_workspace.xml
INFO
This exports the default Behavior Tree together with all required Sub-Trees — ready to be used with AutoAPMS directly.
Export a single Behavior Tree
- Right-click on the Behavior Tree in the Tree Explorer
- Select Export Behavior Tree
- Save the file, e.g., as
my_behavior_tree.xml
Saving the Project
The workspace is automatically saved in the local storage of your browser during your session. If you want to save your workspace for later use, you should export it as XML as described above.
Step 6: What is next?
You have successfully created your first Behavior Tree! Congratulations! 🎉
Explore More:
- Core Concepts Learn the core concepts of AutoAPMS Studio and Behavior Trees
- Workflows Explore different workflows and use cases for AutoAPMS Studio
Need Help?
- Troubleshooting Guide Common issues and solutions for AutoAPMS Studio